T-Shirt Quilts of Texas
The scrapbook you can sleep under.
What Is A Quilt Sandwich?
August 10, 2016
What’s a Quilt Sandwich?
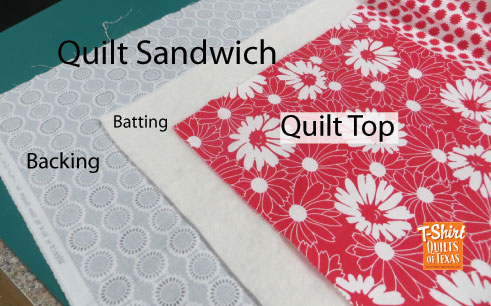 A quilt sandwich is what quilters call the three layers of a quilt. The 'sandwich' consists of the quilt top, the batting and the backing.
The quilt “sandwich” consists of backing, batting, and the quilt top. First, you’ll cut the backing 4” to 6” longer and wider than the quilt top.
If you’re planning to quilt the project yourself, you’ll baste the layers together using thread or safety pins. Use LARGE stitches (or safety pins) anywhere from 4 to 6 inches apart.
To complete the sandwich, you’ll quilt either by hand or by machine. If you plan to have someone else do the quilting for you, you don’t need to baste the layers, and most of the time you don’t need to supply the batting. But do check with your longarm quilter before assembling the quilt backing to make sure the size is sufficient for his or her needs.
NOTE: If taking to a longarm quilter, you don't need to assemble the layers. Just bring the top, backing and batting as separate items.
Layering and Basting
If you quilt a quilt yourself, you need to layer the backing, batting, and quilt top and then baste it all together so you can quilt it. The main challenge is to keep all the layers flat, without the fabric wrinkling or shifting. When I 'used' to do this before getting a longarm quilting machine. I would place the quilt backing right side down on the living room carpet. I would use duct tape to stretch the backing as flat as possible. Place the batting, then place the quilt top right side up. THEN the fun begins. Crawl around on your hands and knees (no longer possible with MY knees!) and either take giant basting stitches with needle and thread (try to avoid stitching the carpet to the quilt ) or use a BUNCH of safety pins to secure the three layers together.
Here are the steps for successful basting (whether on a LARGE table or on the floor).
- Backing: Lay the backing WRONG side up. Keep smoothing until it is totally flat. I use duct tape to tape the edges; first at the corners, then smoothing, then adding more tape until that backing is flat with no wrinkles and is straight. Don't 'tug' on the backing, just keep smoothing and taping.
- Batting: If using pre-packaged batting (meaning it was rolled up and squooshed into a plastic bag by the manufacturer) then you need to let the batting 'rest'. After taking it out of the plastic bag, the batting will expand over time. If your batting has a 'scrim*', that side should be go against the backing. Otherwise, just spread the batting out over the backing. Again, smooth, and let it sit a bit. Then smooth again.
- Quilt Top: The quilt top should be pressed, flat and square. Place it right side UP on the batting and backing. Make sure the batting and backing extend at least 3 inches on all sides of the quilt top.
Start at the center of the quilt and start taking big basting stitches out to the edges of the quilt. Keep doing this until the entire quilt top is basted. Once everything is basted, remove the tape. You are now ready to tackle tying or machine quilting on your domestic machine. For more information about tying a quilt - Click here.
*Scrim - A thin stabilizer that is needle-punched into the batting to add strength, loft, and to prevent stretching and distorting.
Of course, we suggest that you have your quilt professionally machine quilted. You should get a consistent even and pleasant design quilted across the entire quilt. If you choose to have your quilt finished professionally, you do NOT need to layer or baste your layers together. Your professional longarm service provider should have batting and backing materials available if you need it.
AtT-Shirt Quilts of Texas, we have been providing professional machine quilting for nearly 20 years. We use a computerized quilting system that gives you the highest quality stitch and pleasing patterns across your quilt
Back to Longarm Quilting Resource Page
![]()